
agentrq
AgentRQ: Human-in-loop realtime conversational task manager for AI Agents. Self-hosted! Control your own agents from wherever you want Mobile, Web, Desktop. Designed to work well with your own Claude subscriptions and any harness with ACP support.
Links
README
From the repo.
AgentRQ ── Agent-Human Collaboration Platform

AgentRQ is a modern, high-performance platform designed for seamless collaboration between human operators and AI agents. It leverages the Model Context Protocol (MCP) to allow AI models (like Claude) to interact directly with your workspace's task management system.
🚀 Overview
Think of AgentRQ as a shared workspace where humans and AI agents work together seamlessly. You can break down complex goals into manageable tasks, and delegate work directly to your AI agents.
Because agents "see" the workspace state via MCP, they can autonomously pull their assigned tasks, update statuses, request permissions for sensitive actions, and communicate with you—all synchronized instantly across the platform in real-time.
✨ Features
Real captures from the running app — no mockups.
Visual Task BoardEvery task Claude creates appears instantly on your board. See what it's working on, what it needs, and what it just finished — all from a clean, fast dashboard you can open on any device, as a list or a Kanban. | 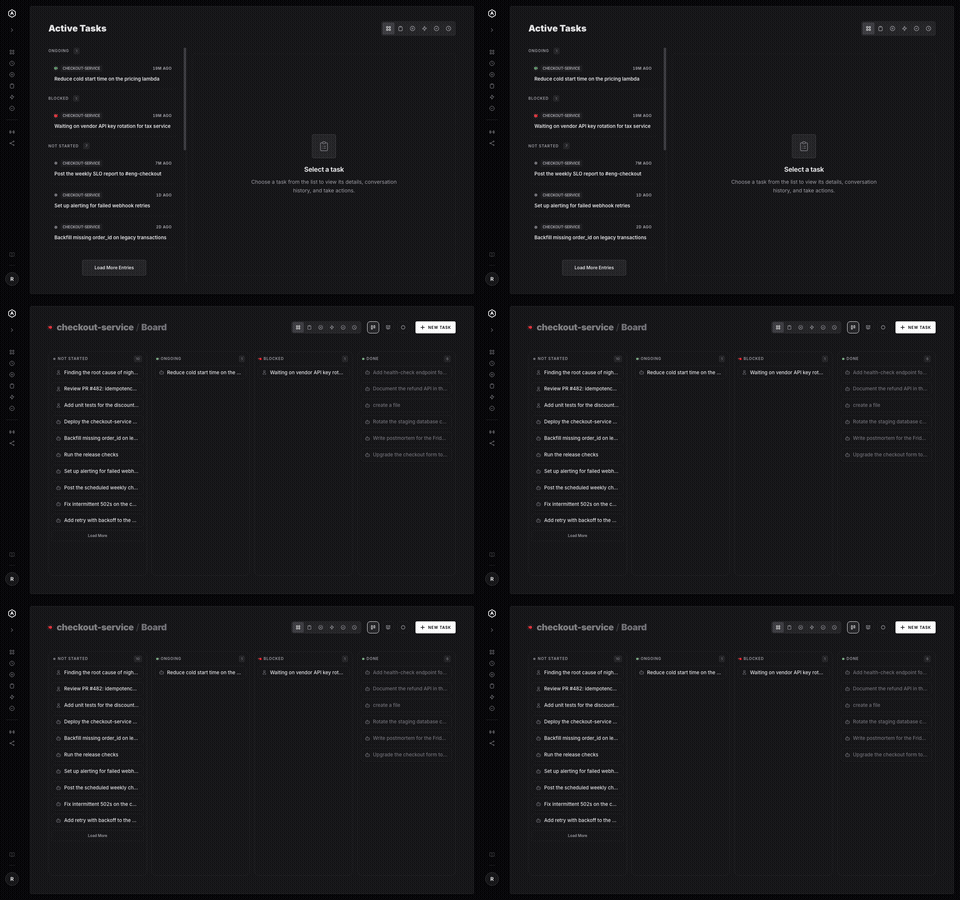 |
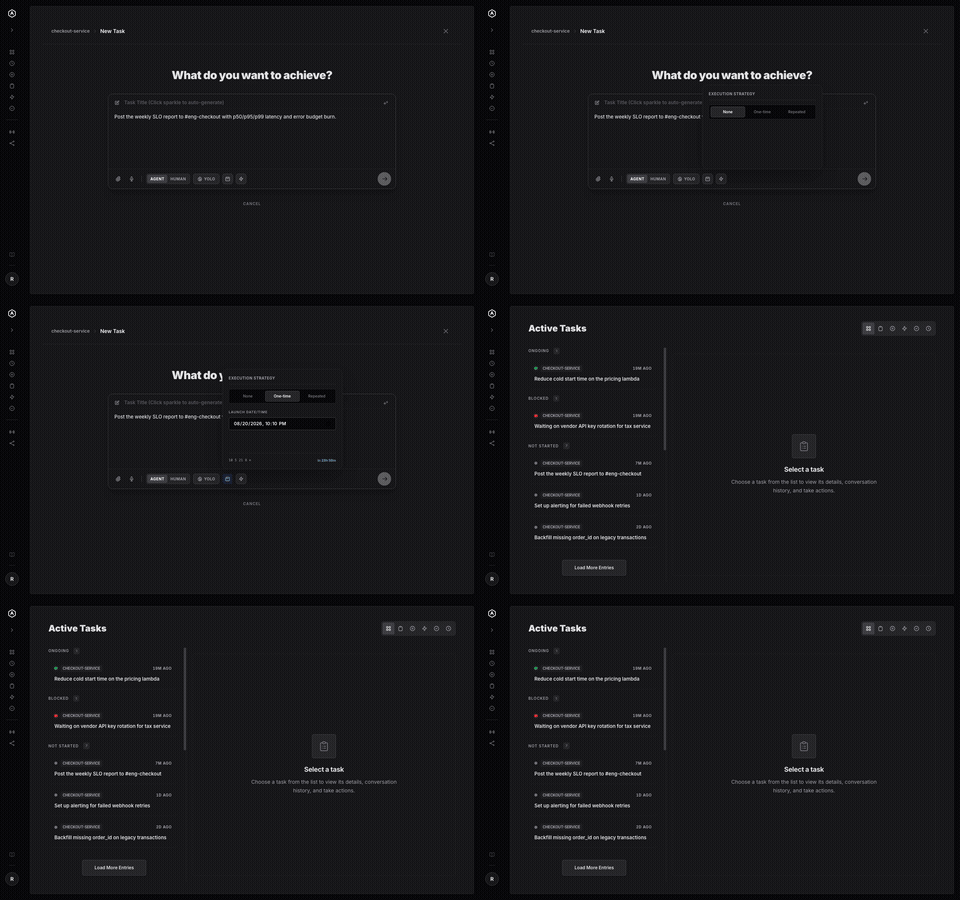 |
Task SchedulingGive any task a launch date, or a recurring cadence — every 15 minutes, hourly, daily, weekly, custom days. A background poller ticks every minute and spawns the task the instant it's due, no server or agent needing to stay awake and wait. |
EventsEvents are named signals — | 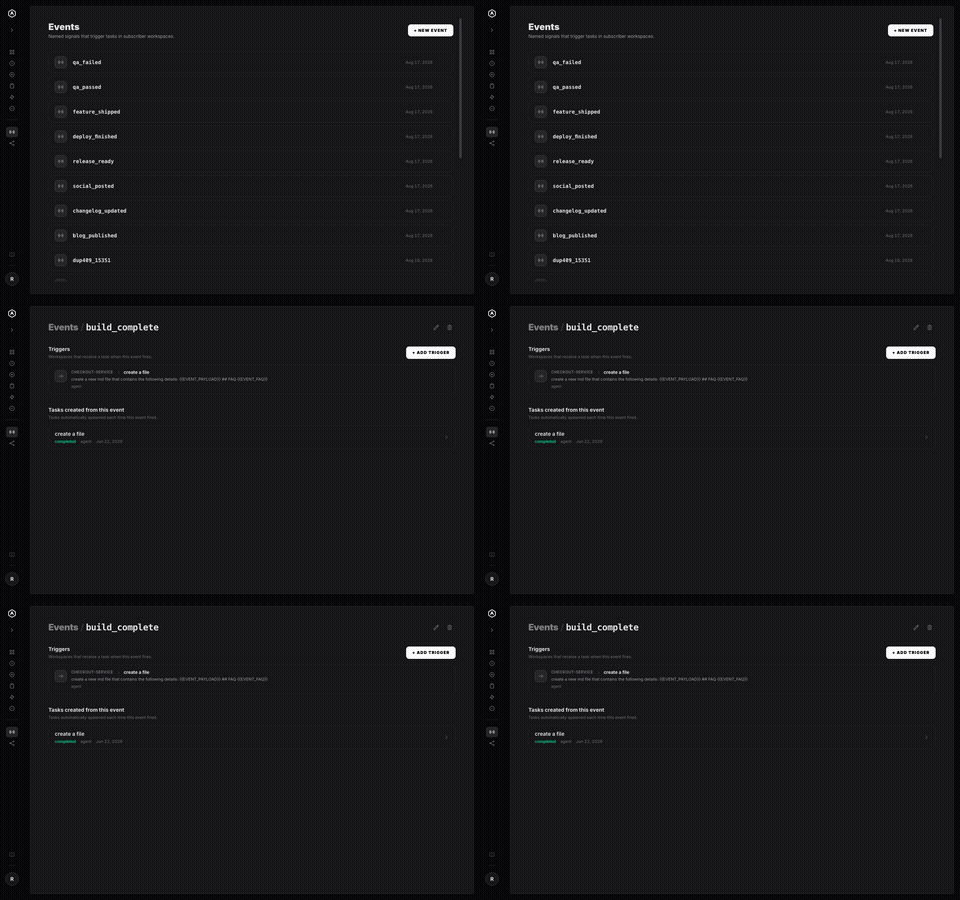 |
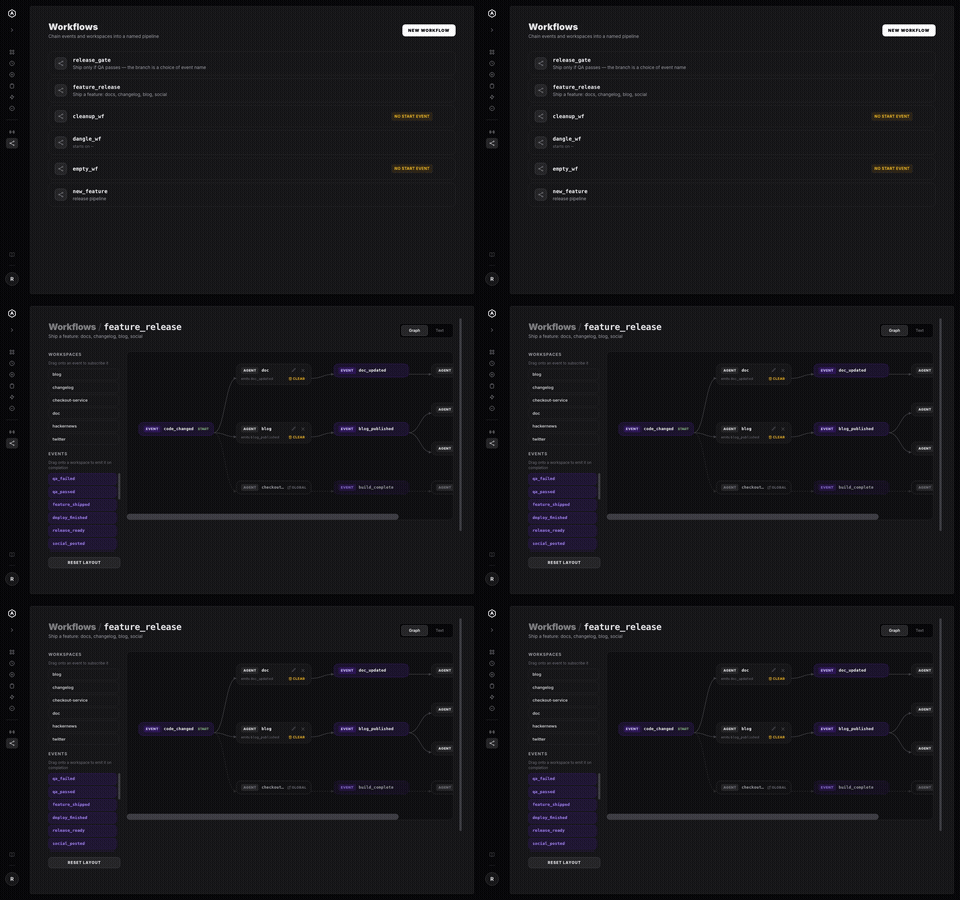 |
WorkflowsA Workflow is Events and workspaces arranged on a graph. Drag a workspace onto an event to subscribe it; drag an event onto a workspace to emit it on completion. No decision-tree DSL, no YAML — just the shape of your release process, visible. |
Tool Call HistoryThe task detail view's History tab lays out a lane-grouped timeline of every tool call and message in a run — Input, Agent, and Tools. Search it, click into any entry, and see exactly what ran, what it returned, and whether it was allowed or denied. | 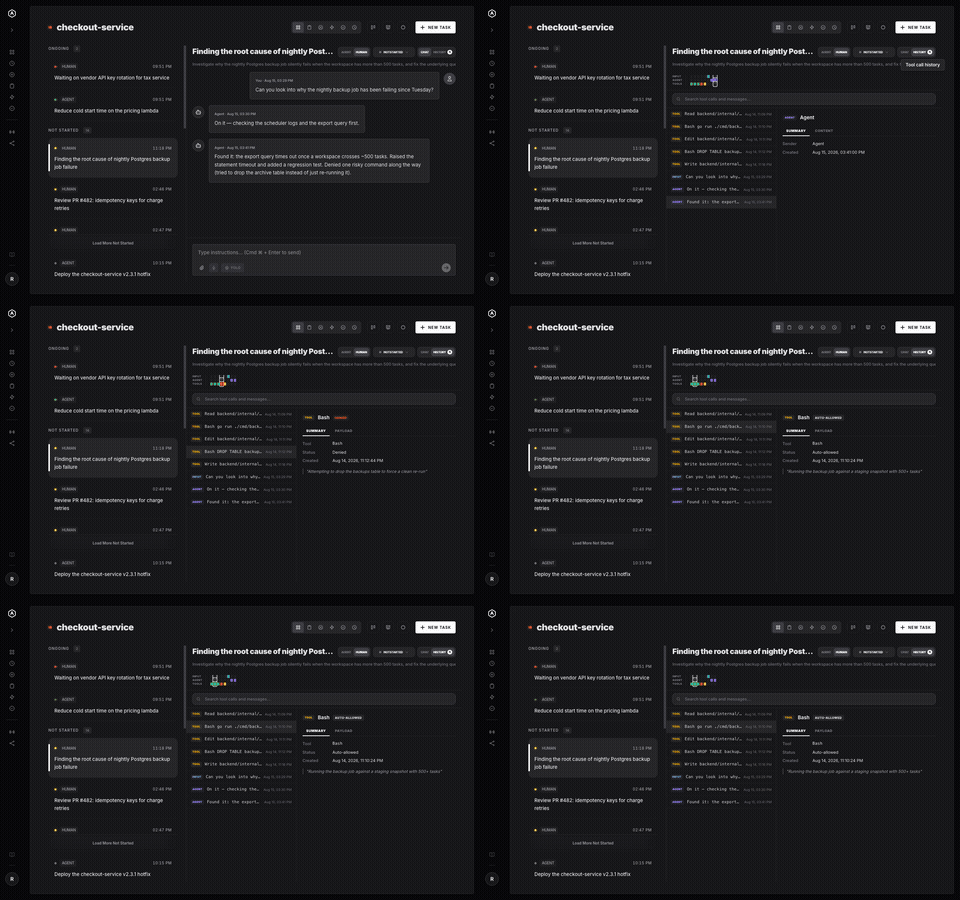 |
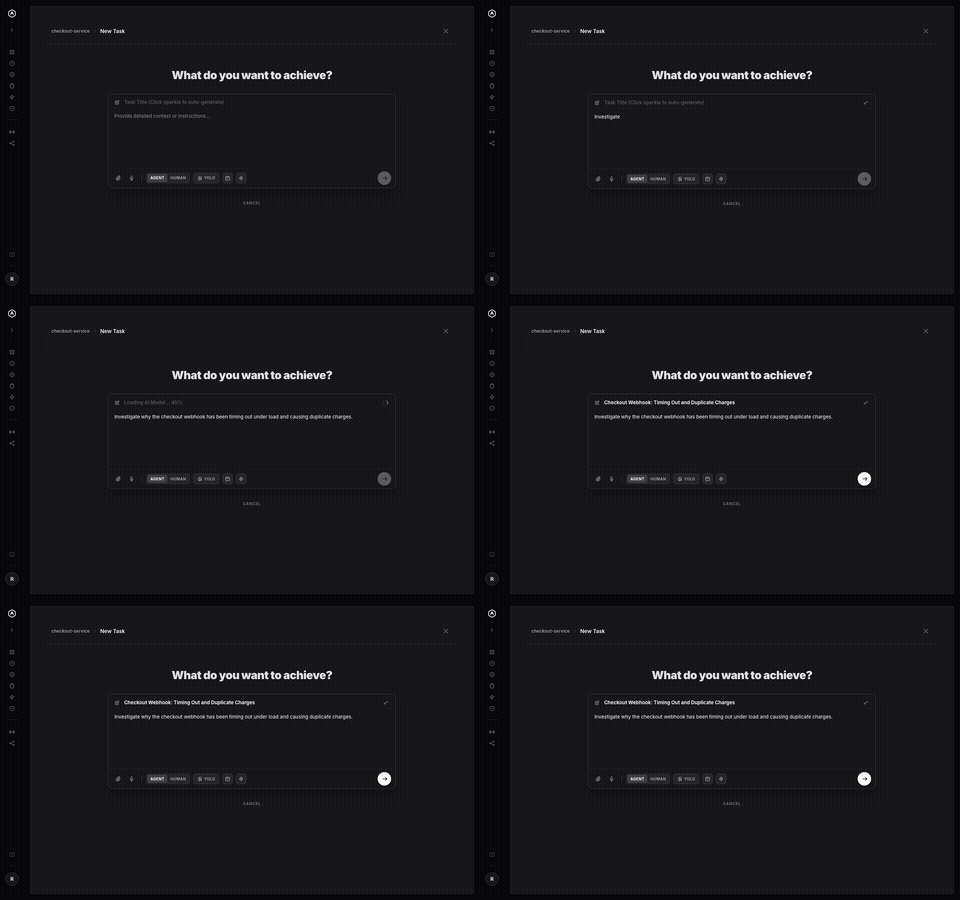 |
Auto-Title GenerationWrite your task description, click the sparkle, and a small language model — downloaded once and cached by your browser — reads it and writes the title. No API call, no server, no data leaving your machine. |
Speech-to-TextClick the mic on any task description or reply and dictate it instead. Transcription runs on an in-browser Whisper model — your voice is processed on-device and never uploaded anywhere. | 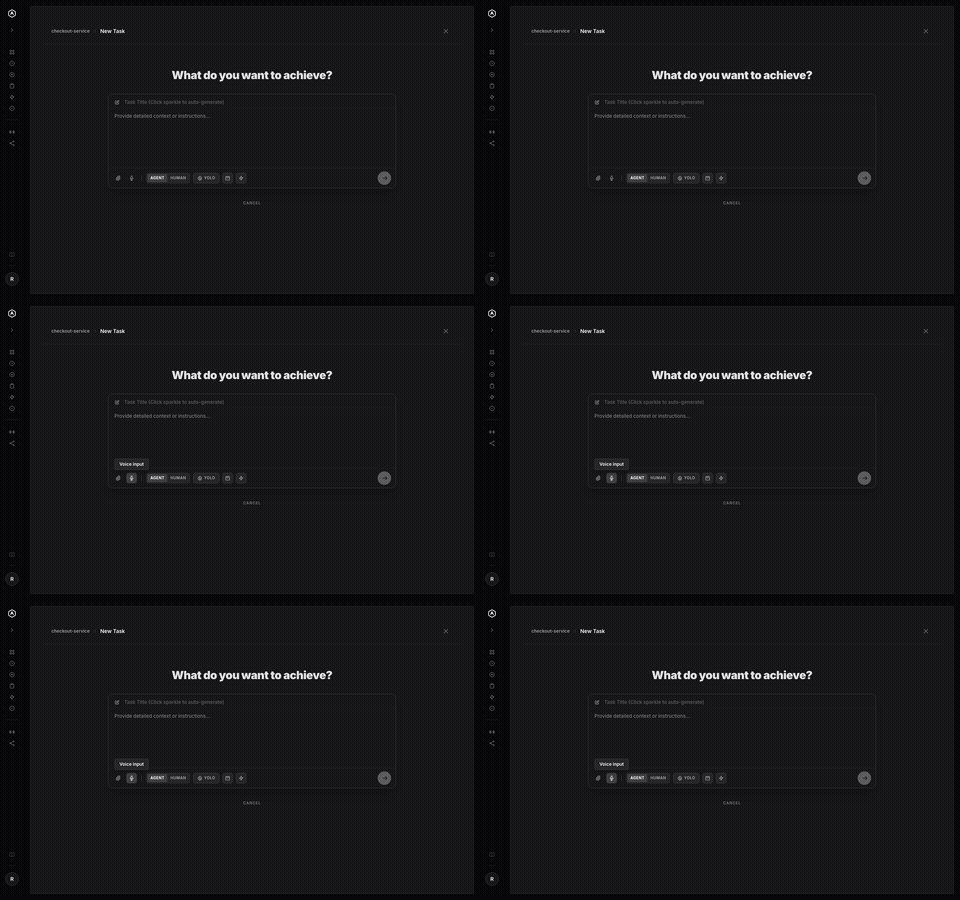 |
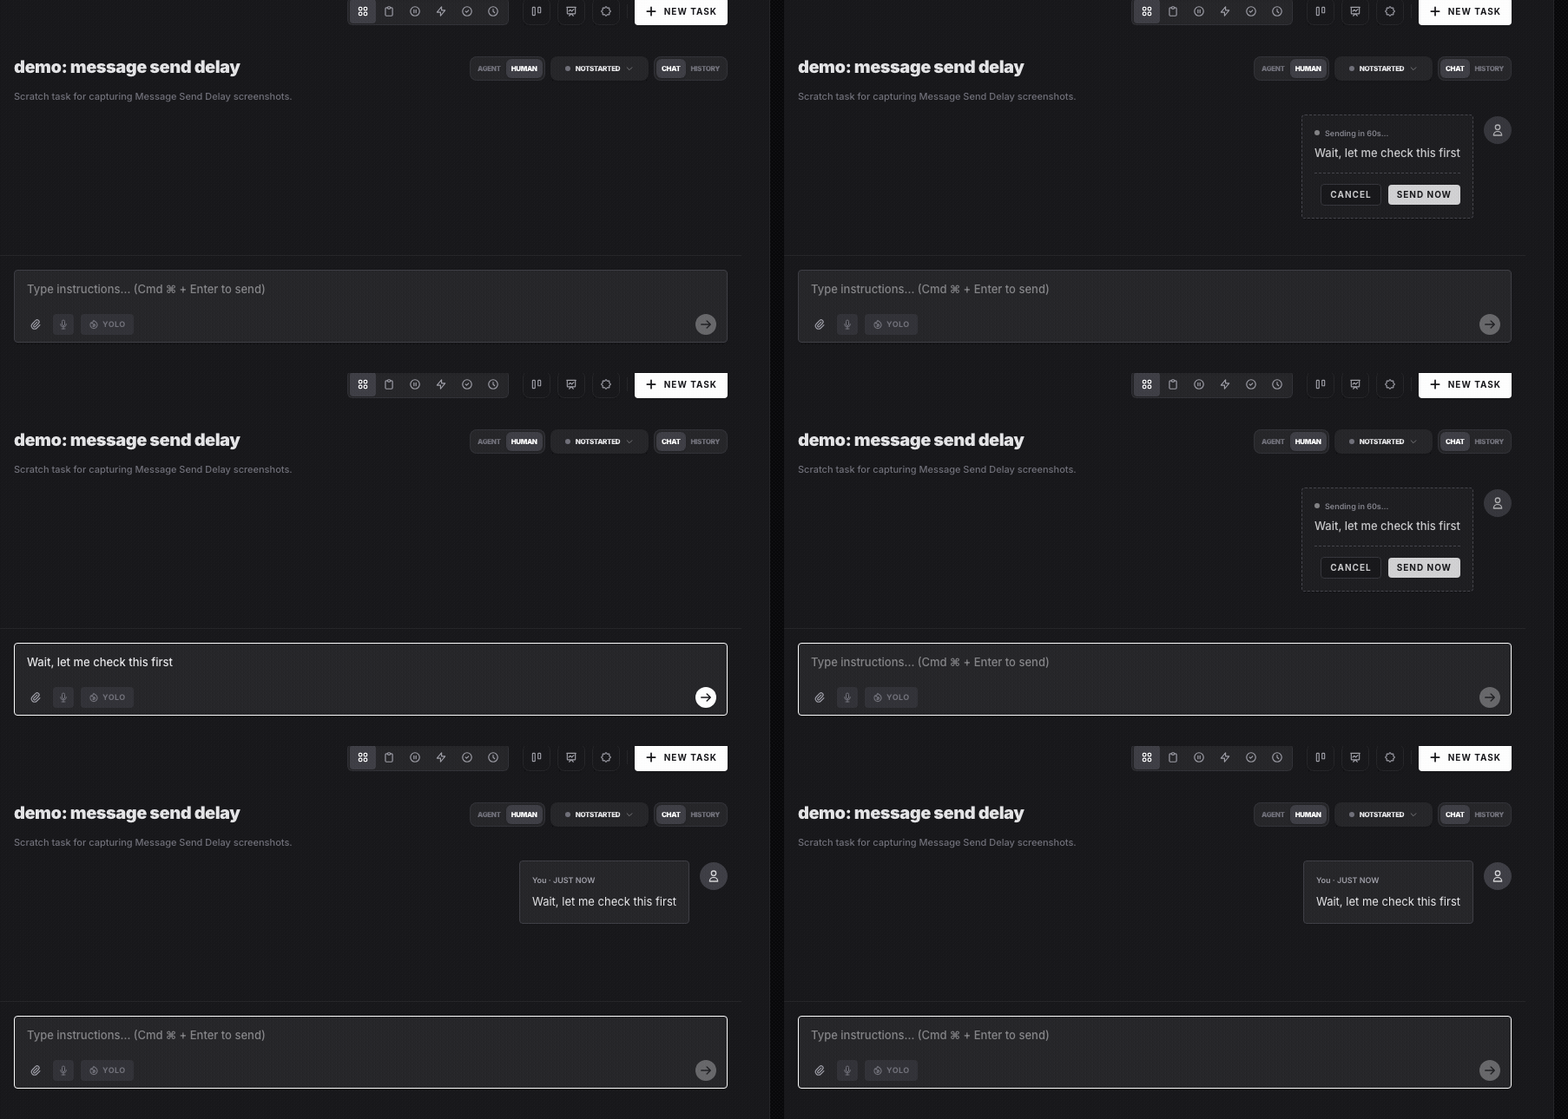 |
Message Send DelayGive a workspace a countdown — 3s, 5s, 10s, 15s, 30s or 60s — and every chat message waits that long in the thread before it reaches the agent. Send Now delivers it early, Cancel pulls it back unsent and puts the exact text and attachments back in your composer. Off by default, per workspace. |
Search & Keyboard Shortcuts⌘K (Ctrl+K off macOS) opens a task finder that matches any word in a title or description, straight from the copy your device already saved — so it answers offline, and tells you how far it looked. Everything else is a bare letter: N for a new task, M and T to flip between a task's chat and its trajectory, ? for the list. Nothing to configure, and nothing to memorise. | 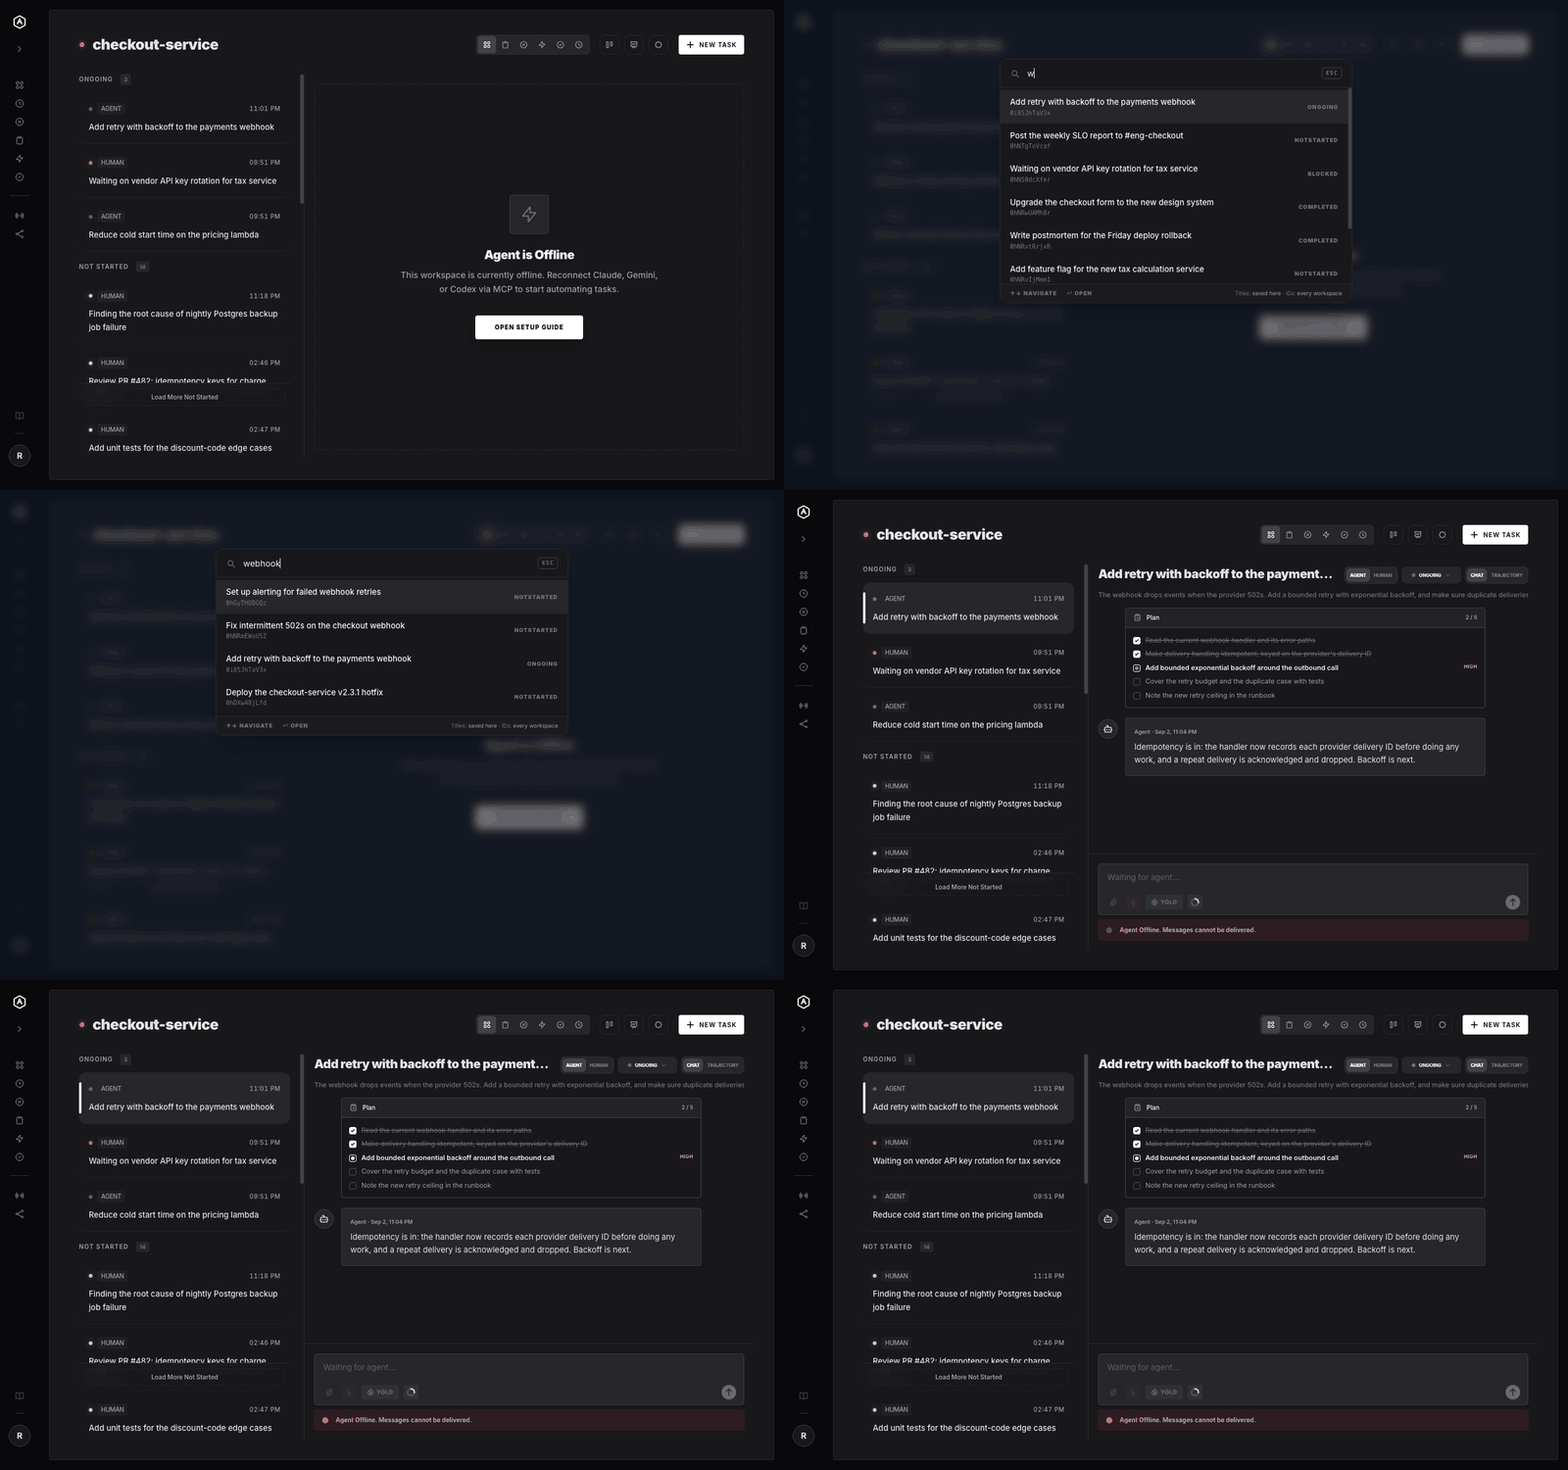 |
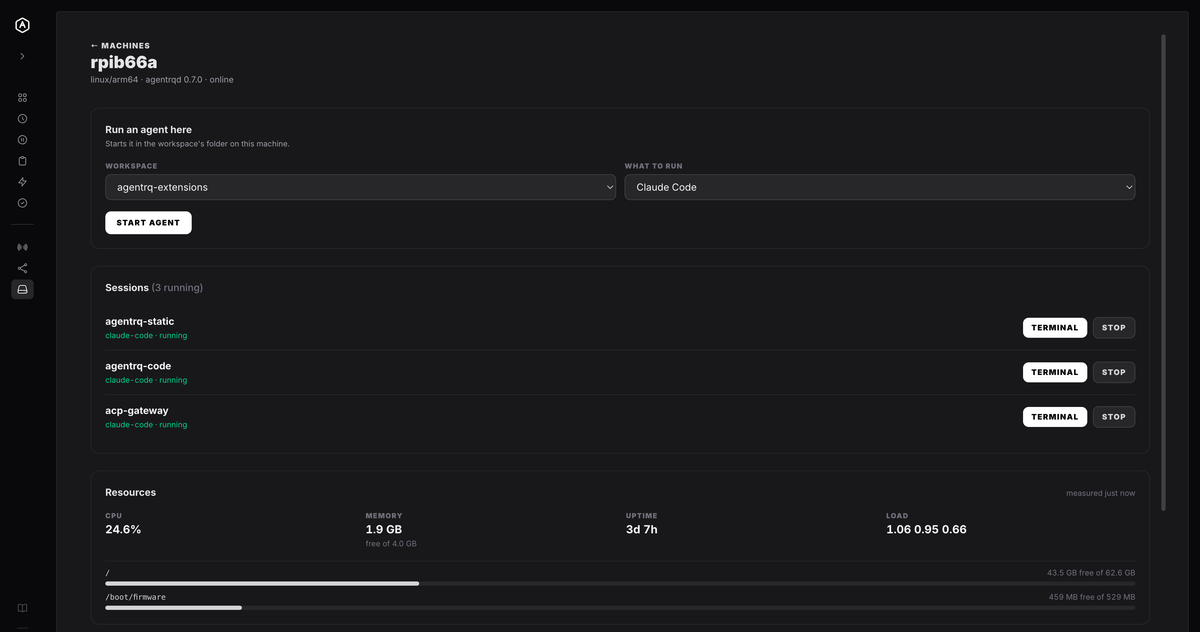 |
MachinesInstall |
Live TerminalsOpen a running session from any browser and you are at the prompt. Keystrokes go straight through as the bytes your keys produced — Esc and Ctrl-C included — resizing reflows the program on the far end, and the session keeps running whether or not anybody is watching. Drop the network and the screen is still there when you come back. | 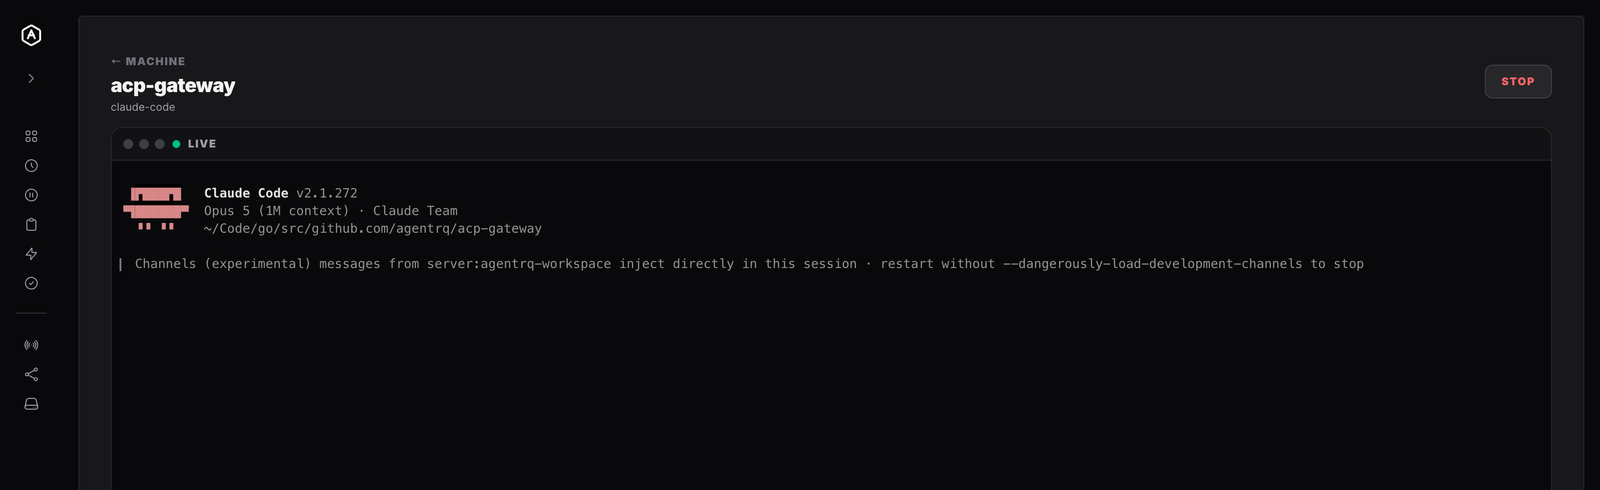 |
See the full list at agentrq.com/features.
🏛 Architecture
AgentRQ follows a decoupled service-oriented architecture:
Backend (Go / Fiber)
- API Server: Fiber-based REST API for workspace and task management.
- MCP Server: Integrated
mcp-goSSE server that exposes tools and resources to AI models. - CoreMCP (Supervisor): A global MCP server that allows agents to manage all workspaces, tasks, and statistics across the entire platform.
- Data Layer: GORM with SQLite for persistent, user-scoped storage.
- Authentication: Google OAuth2 integration with JWT-based session management.
- Event Bus: Internal pub/sub system for real-time SSE notifications.
Frontend (Vue.js 3 / Vite)
- Modern UI: Tailored with Vue 3, Pinia, and Tailwind CSS.
- Glassmorphism: A sleek, premium design language with smooth transitions and real-time updates.
- Reactive State: Synchronized with the backend via SSE events.
Desktop (Electron)
- Same application, native shell: the desktop app renders the same Vue components as the browser, so the two never diverge.
- Native notifications: agent activity reaches you while the window is in the background, with a dock or taskbar badge.
- Tray, global shortcut, deep links:
Cmd/Ctrl+Shift+Nfrom anywhere, andagentrq://URLs that open the app at a specific task. - Auto-updating: checks in the background and installs on restart.
💻 Desktop App
AgentRQ has a desktop app for macOS, Windows and Linux. It is a client — it connects to whichever AgentRQ server you run.
On macOS and Linux, one command installs it — and updates it later:
curl -fsSL https://agentrq.com/install.sh | sh -s -- --quit
Or download the latest release →
| Platform | Download |
|---|---|
| macOS | .dmg — Apple silicon and Intel |
| Windows | .exe installer — x64 and arm64 |
| Linux | .AppImage or .deb — x64 and arm64 |
Builds are currently unsigned, so a hand-downloaded build warns on first launch on macOS and Windows, and macOS cannot auto-update until signing certificates are in place — the install command above is the way around both. Connecting to a server and troubleshooting are covered in the Desktop Guide.
Extending the desktop app
Extensions add pages, actions, keyboard shortcuts and scheduled work. They are
ordinary Node modules, discovered from GitHub repositories carrying the
agentrq-extension topic, and installed from the desktop app.
Extensions are desktop-only, and deliberately so. An extension is code somebody else wrote, running with the privileges of the process it is in. On a self-hosted server that would mean a stranger's code next to your database and your other users; on the desktop it runs on the machine of the person who chose to install it. The server never loads extension code.
What AgentRQ does enforce is everything it owns: which surfaces an extension can contribute to, and which MCP tools it may call against which workspaces — the extension never holds a credential, it asks, and the app attaches the token on the way out. That is a real boundary around your AgentRQ data. It is not a sandbox around your machine, and the install screen says so on every install.
Three worked examples live in examples/extensions/,
from one that asks for no permissions at all to one that runs a daily digest
across every workspace. See the Extensions Guide.
Driving AgentRQ from a browser agent
If your browser supports WebMCP, an AI agent you talk to there can use AgentRQ directly — list your workspaces, open a task, reply in it, build a workflow. Everything the interface can do is offered as a tool, including asking which page you are on, so "reply to this task" resolves to the task you have open.
The tools run in the page as you, with your session, so an agent gets exactly your permissions and nothing more, and they are withdrawn when you sign out. Nothing to install or configure; a browser without WebMCP simply sees no tools. See the WebMCP Guide.
Driving AgentRQ from the command line
Inside a workspace directory — one with the .mcp.json an agent works from —
the same capabilities are a shell command away:
npx -y @agentrq/agentrq-ws@latest help
It reads that .mcp.json, so there is nothing to configure, and it covers every
workspace tool: read and create tasks, reply, publish events, read and write the
workspace memory, ask a human a question. Attachments are plain file paths in
both directions — --attach ./run.log to send one, and a download writes the
file and prints where it went. See
cli/agentrq-ws.
🖥️ Your own machines
Install agentrqd on a computer, enrol it once, and you can start an agent for
a workspace on it from the control panel — then watch its terminal and type into
it, Esc included. The machines page shows what each box has left: memory, CPU
and free space per filesystem, so you can tell whether it can take another
agent.
On Linux and macOS:
curl -fsSL https://agentrq.com/install-agentrqd.sh | sh
On Windows (PowerShell):
irm https://agentrq.com/install-agentrqd.ps1 | iex
Either one picks the right build, verifies it against the checksums
published with the release, and puts it on your PATH; running it again
updates in place. It installs only — enrolling stays a separate, deliberate
step, and it never runs as root or Administrator. Manual installs are on the
releases page
— one static binary for Linux, macOS and Windows.
Then Machines → Add machine gives you a code to enrol it with.
Enrolling a machine is a real grant, and the Daemon Guide says so plainly: it lets anyone who can authenticate as that account run commands on the machine as the user who started the daemon. Read it before you enrol anything. It also covers the local kill switch, which works without the server's cooperation, and what the audit trail records — starts, kills and attaches, never keystrokes.
⌨️ Agent slash commands
Agents connected through the ACP gateway advertise commands of their own —
/init, /compact, /review, whatever they ship with. Type / in a task and
they appear above the reply box, filtered as you type and chosen with the
keyboard or the mouse. The list comes from the agent and follows it live, so it
changes as the agent's context does. An agent that advertises none gets no menu
and nothing changes. See the Slash Commands Guide.
🧠 Choosing the agent's model
Where an agent offers a choice of model, you can make it from the interface — on a workspace card, and on the form where a task is written, so the model is settled before the work starts rather than after. Choosing shows the new model straight away but marks it as asked-for until the agent itself confirms; if it refuses, or never answers, the interface goes back to what is actually running and says so.
The choice appears only where it would do something. An agent that reports no models — Claude Code connected directly, among others — shows none, and neither does an ACP gateway older than the release that learned to switch on request: it says which model it is on without claiming it can change it. Nothing to configure either way.
To run it from source:
make install       # dependencies for the whole repo
make desktop-dev   # run the desktop app against a local server
make desktop       # build installers into desktop/release/
🛠 Getting Started
Prerequisites
- Go 1.21+
- Node.js 18+ (with npm)
- Google Cloud Console: An OAuth2 Client ID and Secret.
Configuration
- Create a
_config/base.yaml(ordevelopment.yaml) in thebackenddirectory. - Fill in your Google OAuth2 credentials:
auth:
  google:
    client_id: "your-google-client-id"
    client_secret: "your-google-client-secret"
Running Locally
Use the provided Makefile to start the full stack:
# 1. Install all dependencies
make install

# 2. Start both Frontend and Backend
make dev
The frontend will be available at http://localhost:5173. For the desktop app,
run make desktop-dev in another terminal — see the Desktop Guide.
Self-Hosting (Docker)
For running the production or development stack using the pre-built Docker image, see the Self-Hosting Setup Guide.
[!NOTE] Agents / AI Assistants: If you need to set up, configure, run, or diagnose a local self-hosted instance of AgentRQ using Docker, refer to SETUP.md for step-by-step instructions, Docker run commands, and environment variable configurations.
🤖 Claude Code & AI Integration
AgentRQ is designed for seamless integration as a Claude Channel. This allows your AI agents to see tasks assigned to them and respond directly within your Claude session.
Each workspace has its own MCP URL and token (visible in the workspace setup modal). In production, these follow the pattern https://WORKSPACE_ID.mcp.agentrq.com/.
Step 1 — .mcp.json
Create a .mcp.json file in your local project directory (the leading dot is required). Each project gets its own file so Claude instances stay isolated per workspace. Replace YOUR_MCP_URL below with the full URL shown in the setup modal (e.g. https://WORKSPACE_ID.mcp.agentrq.com/?token=TOKEN).
{
  "mcpServers": {
    "agentrq-WORKSPACE_ID": {
      "type": "http",
      "url": "YOUR_MCP_URL"
    }
  }
}
Step 2 — .claude/settings.local.json
Add a .claude/settings.local.json file in the same project directory to pre-approve the AgentRQ tools and avoid permission prompts on every action. The wildcard covers every tool the workspace exposes, including any added later:
{
  "permissions": {
    "allow": ["mcp__agentrq-WORKSPACE_ID__*"]
  },
  "enableAllProjectMcpServers": true,
  "enabledMcpjsonServers": ["agentrq-WORKSPACE_ID"]
}
Step 3 — Start Claude
Once both files are in place, launch Claude Code from that project directory:
claude --dangerously-load-development-channels server:agentrq-WORKSPACE_ID
Tip: The workspace ID, full MCP URL (with token), and ready-to-paste config snippets are all available in the Setup modal inside each AgentRQ workspace.
Available MCP Tools
When connected, the AI agent has access to:
createTask: Assign a task to the human user (supports optionalcron_schedulefor recurring tasks).updateTaskStatus: Move tasks throughnotstarted,ongoing,blocked, andcompleted.reply: Send messages back to the AgentRQ dashboard in real-time.getWorkspace: Fetch the workspace name, mission description, and task statistics.getTask: Fetch a task — with notaskIdit dequeues the next "not started" task assigned to the agent; with ataskIdit returns that task. PassincludeConversation: trueto also include the chat history (cursor-based pagination).downloadAttachment: Retrieve an attachment by its ID.publishEvent: Fire a named event so subscriber workspaces spawn their trigger tasks.loadMemory: Read the workspace's notes — with no name it readsmemory.md, the index of everything remembered here.saveMemory: Write a note that outlives the task, so the next agent starts with it.deleteMemory: Remove one of the workspace's notes.searchSkills: Find the skills the workspace can use — its own and those shared into it — with each one's description andskill://URI. Optionalq(at least 3 characters) matches name or description; optionallimit/offsetpage through the results.loadSkill: Read one file of a skill by itsskill://<name>/<path>URI; aSKILL.mdcomes with the URIs of the skill's other files.saveSkill: Write one file of one of the workspace's own skills. WritingSKILL.mdcreates or updates the skill.deleteSkill: Delete one of the workspace's own skills, or one of its files.elicit: Ask the human a question and block until they answer, either as a form or as a link to confirm.- Real-time Notifications: Agents receive notifications via the
notifications/claude/channelprotocol whenever a human interacts with their tasks.
Skills
Skills are SKILL.md playbooks that agents load when a task matches one. Each workspace has its own, can import them from a public GitHub repository such as obra/superpowers, and can share them with the account's other workspaces. See docs/SKILLS.md for the format, limits, importing, sharing and the skill:// scheme.
🌉 ACP Gateway (Bridge for ACP Agents)
While Claude Code has native support for claude/notifications, other agents like Antigravity and Codex require a bridge to receive real-time task notifications from AgentRQ. The @agentrq/acp-gateway bridges the Agent Client Protocol (ACP) with MCP to enable this.
There is nothing to install — npx fetches the gateway, and the gateway fetches
the agent you name.
Usage
- Ensure you have a
.mcp.jsonin your project root. - Log in to your agent once, then start the gateway from the same directory as
.mcp.json:
# Using Antigravity
npx -y @agentrq/acp-gateway@latest --login --agent antigravity-acp --allow-unverified-agent
npx -y @agentrq/acp-gateway@latest --agent antigravity-acp --allow-unverified-agent
# Using Codex
npx -y @agentrq/acp-gateway@latest --login --agent codex-acp
npx -y @agentrq/acp-gateway@latest --agent codex-acp
Antigravity is published as a binary the registry carries no checksum for, so it
needs --allow-unverified-agent on every command; Codex ships as an npm package
and does not. Sign out again with --logout in place of --login.
The gateway will automatically:
- Connect to your AgentRQ workspace via the URL in
.mcp.json. - Spawn the agent subprocess and bridge standard I/O.
- Forward task assignments, messages, and permission requests in real-time.
🌌 Codex (via the ACP Gateway)
OpenAI Codex connects through the same
ACP Gateway as every other agent. The
gateway resolves codex-acp from the ACP registry
and runs it for you, so there is nothing to install and nothing to configure
beyond the .mcp.json the gateway reads.
Earlier releases used a separate
@agentrq/codex-gatewaypackage and a.codex/config.toml. Neither is needed now.
Setup
- Ensure you have a
.mcp.jsonin your project root. - Log in — Codex will not open a session until you have. The first run fetches the agent, then hands you its login:
npx -y @agentrq/acp-gateway@latest --login --agent codex-acp
- Start the bridge. Run it from the same directory as
.mcp.json:
npx -y @agentrq/acp-gateway@latest --agent codex-acp
Sign out again with --logout in place of --login. The registry publishes
Codex as an npm package, so npx fetches it on first use and keeps it current —
unlike the binary agents, it needs no --allow-unverified-agent.
👑 Supervisor (CoreMCP)
While individual workspaces provide a scoped view for specific projects, the Supervisor (CoreMCP) is a global MCP server that grants an agent bird's-eye view and management capabilities across your entire AgentRQ account.
The Supervisor is accessible at https://mcp.agentrq.com/mcp. It uses OAuth2 for secure authentication, allowing modern AI tools (like Claude Code) to connect securely.
Why use the Supervisor?
- Multi-Workspace Management: List, create, and update workspaces.
- Global Task View: Fetch tasks from all workspaces in a single call (
listAllTasks). - Administrative Control: Manage task assignments, status, and priorities globally.
- Unified Statistics: Access detailed statistics and health metrics for any workspace.
Available Supervisor Tools
The Supervisor provides a comprehensive suite of tools for global management, requiring workspaceId parameters where applicable:
Workspace Management
listWorkspaces: Overview of all active and archived workspaces.createWorkspace: Bootstrap new project environments.getWorkspace: Retrieve details of a specific workspace by ID.updateWorkspace: Modify workspace settings and metadata.getWorkspaceStats: Retrieve high-level analytics and performance data for a workspace.
Task Management
listAllTasks: Search and filter tasks across the entire platform.listTasks: List tasks within a specific workspace.createTask: Create a new task in a specific workspace.getTask: Retrieve details of a specific task.updateTaskStatus: Change a task's status.updateTaskOrder: Reorder a task in the list.updateTaskAssignee: Change the assignee of a task.updateTaskAllowAll: Toggleallow_all_commandspermission for a task.updateScheduledTask: Modify a scheduled/cron task.deleteTask: Delete a task with its messages and attachments — the way to retire a schedule rather than leave it running.
Communication & Files
replyToTask: Post a message to a task's chat thread.respondToTask: Submit an allow/deny verdict for a permission request.getAttachment: Retrieve data as base64 and metadata for a specific attachment.
Workspace Memory
listMemories: List a workspace's memories — name, size and when each changed.getMemory: Read one memory in full.MEMORY.mdis the index the others hang off.
Workspace Skills
searchSkills: Find the skills a workspace can use, its own and those shared into it, by name or description (q, at least 3 characters), withlimit/offsetpaging and atotal. Content is not included.getSkill: Read one file of a skill by itsskill://<name>/<path>URI;skill://<name>alone reads itsSKILL.md.
Machine Setup
createEnrolmentCode: Mint a one-time code for enrolling a new machine withagentrqd. Shown once and expires shortly — there is no remote enrolment, so it hands back a ready-to-run command rather than acting on the machine itself.
Events & Triggers
An event is a named signal a workspace publishes; a trigger creates a task somewhere when it fires. Publishing stays agent-side (publishEvent on the per-workspace server) — the supervisor builds the wiring, the workers fire it.
listEvents,createEvent,getEvent,updateEvent,deleteEvent: define the signals.createEventTrigger,listEventTriggers,getEventTrigger,updateEventTrigger,deleteEventTrigger: decide what each one causes.listEventTasks: see the tasks an event has spawned.
Workflows The graph those pieces add up to: a start event, and the steps that react to it and to each other.
listWorkflows,createWorkflow,getWorkflow,updateWorkflow,deleteWorkflow: the graph itself.createWorkflowStep,listWorkflowSteps,deleteWorkflowStep: its nodes, one at a time.getWorkflowText,replaceWorkflowFromText: the whole graph as the indented document the UI's text mode edits — the declarative way to write one.listWorkflowTasks: see the tasks a workflow has spawned.
Supervisor Resources & Prompts
Beyond tools, the Supervisor also exposes MCP resources — read-only reference material an agent can pull into its own context — and MCP prompts — ready-made templates for the workflows a "single brain overseeing many workspaces" is for.
Resources:
agentrq://guides/new-workspace: how to set up a new workspace end-to-end.agentrq://guides/agentrqd-setup: how to installagentrqdand enrol a new machine, with the enrol command templated to this server.
Prompts:
new-workspace: scaffold a new workspace for a stated purpose.setup-agentrqd: mint an enrolment code and hand back the exact commands to run on a new machine.workspace-status: a status report across every workspace at once.
Connecting to Supervisor (Claude Code)
Since the Supervisor uses OAuth2, you can connect it using the following configuration in your ~/.mcp.json:
{
  "mcpServers": {
    "agentrq": {
      "type": "http",
      "url": "https://mcp.agentrq.com/mcp"
    }
  }
}
When you first run Claude with this server, it will provide a link to authenticate via your browser.
🧩 Official Extensions
AgentRQ provides official extensions for major AI agent CLI tools to simplify setup and integration with its supervisor MCP. The sub agents MCPs should use their own workspace specific MCP server URLs.
🍊 Claude Code
Two plugins for Claude Code are published from this repository's own marketplace, each with a skill and pre-configured MCP access:
agentrq— the supervisor, talking to the account-level MCP server so one agent can orchestrate work across every workspace you own.agentrq-workspace— the workspace agent, connected to a single workspace's MCP server to work its queue.
Installation:
/plugin marketplace add https://github.com/agentrq/agentrq
/plugin install agentrq@agentrq
/plugin install agentrq-workspace@agentrq
Previously these lived in a separate
agentrq-claude-extensionrepository. The marketplace URL is now this repository; if you added the old one, re-add the marketplace at the URL above.
♊ Gemini CLI
The Gemini CLI extension allows you to manage AgentRQ workspaces and tasks directly from your terminal using Google's Gemini models.
Tip: To enable real-time task notifications with Gemini, use the ACP Gateway.
Installation:
gemini extensions install https://github.com/agentrq/agentrq-gemini-extension
🐋 DeepSeek Harness
The @agentrq/dsh-plugin-agentrq bundle brings AgentRQ into DeepSeek Harness. It bridges the workspace's tools to the model as mcp__agentrq__* and holds a supervised workspace session, so tasks assigned to the agent and the human's replies arrive over the MCP channel and land in the live session — no polling, and no leaving the harness to work the queue.
Installation:
npx @deepseek-ai/dsh plugin --profile agentrq-<workspace> add @agentrq/dsh-plugin-agentrq
# pin this workspace's MCP URL in ~/.dsh/profiles/agentrq-<workspace>/cordis.patch.yml
npx @deepseek-ai/dsh --profile agentrq-<workspace>
Copy the filled-in commands and config block from Workspace Settings → Setup → DeepSeek Harness. A dsh profile serves one workspace and carries its own endpoint, so run one profile per workspace and switching workspaces is switching profiles. Delivery, startup catch-up, and reconnect behavior are configurable; see the plugin README.
🔌 Integrations
Slack Integration
AgentRQ supports multi-tenant Slack integration for real-time task creation, thread replies sync, and agent permission requests:
🙌 Contributing
Bug reports go in a GitHub issue and feature or architecture ideas go in a short written proposal — see CONTRIBUTING.md.
🤝 Credits
- AgentRQ — The official Agent-Human collaboration platform.
- HasMCP — Bridge the Gap Between APIs and Agents.
📝 License
Apache-2.0
Collected info
- ★ 1,123 stars
- ⎇ 80 forks
- Language: Go
- Source updated: 9/21/2026
Config for your environment
Replace {MCP_ENDPOINT_URL} with this MCP’s endpoint URL (from its repo or docs above). No API key — you connect directly.
Tool
OS
Config file: ~/.cursor/mcp.json
{
  "mcpServers": {
    "mcp-server": {
      "url": "{MCP_ENDPOINT_URL}"
    }
  }
}Paste into mcpServers in the config file. Restart Cursor after saving.
If this MCP is also published on mcpchannel.ai, you can subscribe from Browse and use the gateway config there instead.